|
Some
advices for the unit have the life longer than 100,000 hours
:
1, The R-7HE had built in full analog
regenerative power supply, full class A power supplies and signal amps,
these designs will produce 25 centigrade higher than the room
temperature , we are advice shut down the unit for more than 2 hours
after continuously working 12 hours . The unit only need around 15
minutes for warm up.
2, Keep its top cover , side faces had least 3 CM space
and far to other heat gears for better heat follow
away .
3, Let it working in the room temperature lower than 30 centigrade . For
better sound reproduce, we had applied the R core transformer but the
power Consumption is large, so if the power supply over 245V or 125V may
cause the transformers had hum.
Please note:
The product even had burn in over 300 hours before shipping.
You can power on it with playing music if you are at home for
quickly finished burn in. If you don't want listen music during the
burn in term, you can turn the amp volume to minimum.
Please power off before connect or
disconnect the inputs and outputs .
Power on the product must had more
than the half minute after last power off .
|
Function introduce :
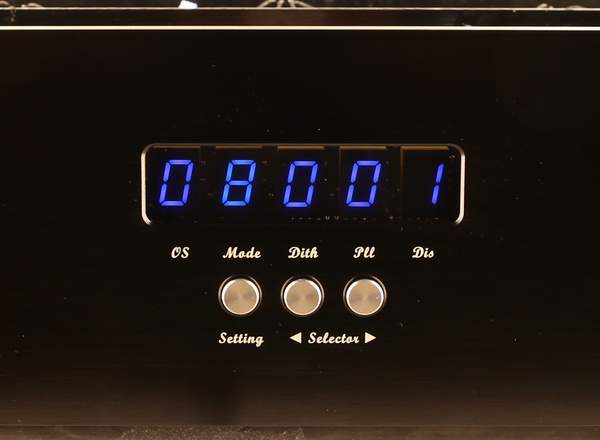
The DAC can setting the digital
process functions on front plate to change the sound flavors, without open the unit .

Important warn:
Before push the
"Setting" button,
we are advice user turn low the amp volume, stop the
music track playing .
Because for
the aim to reproduce the best sound quality, the DAC without mute design , change the
setting may output circuit switch sound .
Around 5 seconds after non
any button had push, the display stop blink, user
can click the music track to playing and turn up the volume.
Setting button :
Push the
"Setting" button one
time, the one digit display will blink for active the function
setting , push the right "Selector" button can change function . While
the display blink, push "Setting" again , the right next
one digit display
will blink , push the left "Selector" button the left next one digit
display will blink .
While the "Dis" LED blink, push
the "Setting" one time , the menu will change to menu page 2.
Left Selector buttons:
While
the display non blink, for select the input sources.
While the display blink,
for the setting digit move one left.
Right Selector buttons:
While
the display non blink, for select the input sources.
While the display blink, for
setting the digital process functions.
Menu Page 1:
OS (Oversampling) :
"O" for select oversampling,
"N" for select NOS mode.
Mode ( OS and NOS modes):
While OS
setting on "O" mean the DAC working under oversampling
mode, lower number OS modes sound became warmer
and smoother. Or depend on your sense .
Mode "0" : class
technology NOS mode.
Mode "2" : 2X oversampling.
Mode "4" : 4X oversampling .
Mode "8" : 8X oversampling.
While OS setting on "N"
mean the DAC working under NOS mode,
different modes offer different sound features, usually mode 3 is
most users favorite. Or depend on your sense .
Mode 1 : Simplest data process
.
Mode 2 : Data fifo.
Mode 3 : Fastest data process.
Dith (Dither) :
Active
(1) or Disable (0) dither for all inputs.
Pll (PLL) :
Active
(1) or Disable (0) PLL for USB and HDMI inputs, we are advice setting
Active (1) for the low performance source but Disable (0) for the
high performance source, or depend on yourself sense .
Di (Display) :
Active (1) the display
auto dark, the display will become dark in around 10 seconds after
stop operate any buttons . Disable (0) the display auto dark, the display light
always.
Menu Page 2:
1st number (synchronizer for HDMI) :
If the HDMI
input had noise, distortion or some samplings no sound, user can setting the
1st number ON
(1) or OFF (0) to fixed the issue. In default is OFF (0) .
2nd
number (synchronizer for USB) :
If user want
to replace other brands USB module in the unit, user can setting the
2nd number ON
(1) or OFF (0) to find the best match .In default is OFF (0) .
|


