|
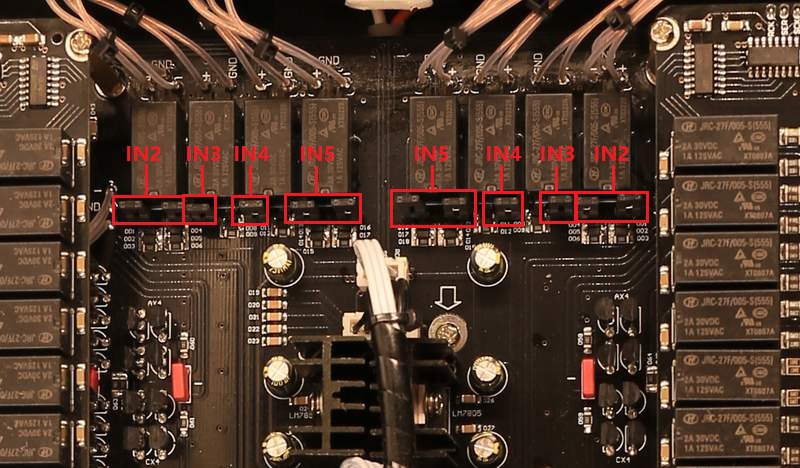
The unit applied input short design :
The
unit had design the analog idle input
short circuit for avoid the disturb between different sources.
This design also applied in a
lot high end
brand devices.
The working theory :
Without the idle input short circuit
,if
the
input 5 and input 4 had connect two extra DACs, while users select
the either input 5 and input 4 , the another input signal
will fire through the circuits and mix into the using signal, even though this
signal is weak but still can degrade on the sound
quality.
With the idle input short
circuit function : if user select either the input 5 and input 4, the
another input signal will short
circuit then no any signal fire through circuits , can keep the sound
quality had not degrade.
Below case users
don't want the idle input short
circuit function, users can open the chassis, pull off the jumpers of
the proper input channels, please note must pull off of left and right
channels together :
1, The same extra source not only connect the
unit analog input, but connect with other amps simultaneity.
2, The same extra source connect to the
unit
different inputs at simultaneity.

¡@ |
Function introduce:


¡@
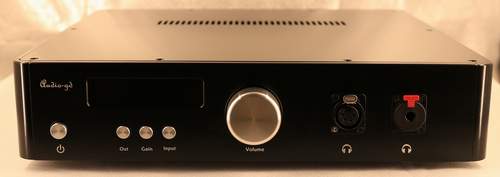
OUT Button :
Select the Master 19
output model , display "H" mean for headphone output,
display " P" mean for preamp output.
Gain
Button :
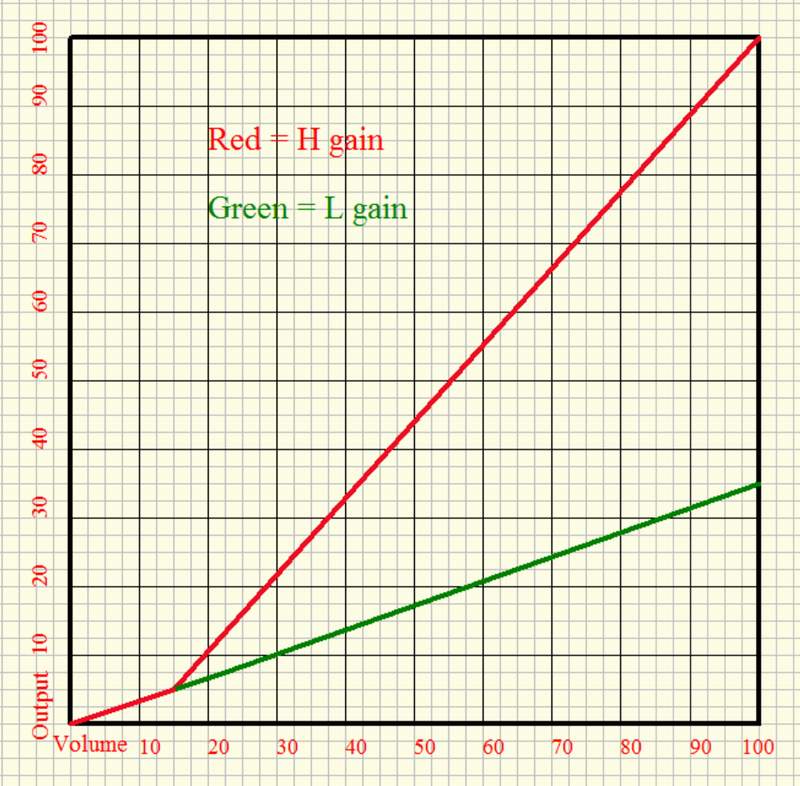
The L gain mode has 16DB gain, for drive
the headphones which have over 100DB sensitivity or work as preamp.
The H gain mode has 25DB gain,
for drive the headphones which have 80-100DB sensitivity.
We have
applied the new gain technology ,no
any switches, relays or parameter of the amp change while change the gain
modes so the sound quality is exact same in different gain modes.
Users just want to choice the better mode for easy adjust the volume
level.

¡@
Input
Button :
Select the Master 19
inputs from IN 1 to IN 5.
Volume knob :
Select the Master 19
volume control .
Setting mode :
Push the "Input" button
and select input channel "5" , turn the volume knob to volume 0,
then turn the volume knob down side one step to into the
setting menu.
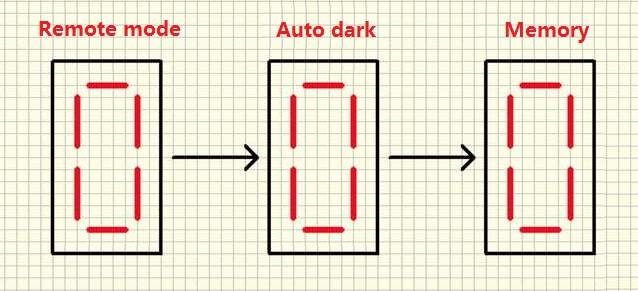
In
setting mode, push the "Input" button , the one of the 3 digital
number blinking.
Push the "Gain" button once,
the blinking digital number change between 1 and 0 . 1 means the
function active, 0 means the function disable.

The left first digital number means the remote function setting,
if it set to 0, whether long or short push the remote controller
volume button, the unit volume only change 1 step . If set to 1,
push and hold the remote controller volume button, the unit
volume change continuously .In case if set to 1 but the unit had
control by other devices , set to 0 please.
The left second digital number is for set the auto dark. Set to
0, the unit display always lights while power on. Set to 1, the
unit auto dark after around 10 seconds while the unit power on
and without operate any buttons, there is only a LED has light
for show the unit power state.
The right first digital number for set the volume memory
function. Set to 0, the unit has not volume memory . Set to 1,
the unit has volume memory even restart .
|
