|
The unit applied input short design :
Nowdays a lot high and middle range preamps, headphone amps and
integrated amps had applied the input short design .
Without the input short design , if the amp connect to multi-ply
sources and all source had playing , different sources will had
the signal crossing cause the sound quality degrade .
For example, the input 1 connect to a DAC and the input 2
connect to a CDP, while both had playing, the CDP signal will
crossing to the input 1 , mix with the DAC signal cause the
sound degrade.
In world there are more than 99% DACs and the sources had allow
the outputs short , if your DAC decalre can't short the output ,
please custom order the amp without input short , but in the
case , while you connect multi-ply sources, you are better only
let one power on and others power off for avoid the signal
crossing . |
|
How to connect the
Precision 1 ACSS input ?
The
Precision 1 ACSS input can connect any balanced DACs which is have ACSS design .
The Precision 1 also can connect the KRELL
CAST output devices and STARI source with adapt cables .
The unbalanced DAC made by audio-gd, like
DAC-19, NFB-2 series and NFb-3 series DAC shipping before 15th Aug.
2013, must buy the especial ACSS cable connect to Precision 1 .
All audio-gd DACs shipping after 15th Aug.
2013 can connect to Precision 1 with standard ACSS cable.
The Precision 1 RCA inputs can connect any
RCA output devices in world . |
|
Full functions
protect:
The Precision 1 have built in MCU to implement
protect detect for protect the speakers and the amp have not shatter
by wrong operate , the protect
detect include separate Left and Right channels DC offset and over
current output .
In normal working state the display won't show
the " P - - P" .
The display flash the "P - - -" mean the Left
channel have higher DC offset or over current output .
The display flash the " - - - P" mean the
Right channel have higher DC offset or over current output .
The display flash the " P - - P" mean the both
channels have higher DC offset or over current output.
In the case, users must shut down the Precision
1, find what matter cause the problems , then power on the Precision
1 again .
Usually if the source have quite high DC offset
feed to Precision 1 may cause the Precision 1 have high DC offset .
(Precision 1 built in DC serve can correct low level DC offset of
the sources )
Over current output may cause by below issues:
A, The speakers cables have short between + and - .
B, The speakers have not use with long term, the speakers
cores have wet cause the impedance is very low . |
|
Keep the Precision 1 have good air follow state.
The Precision 1 for have larger power
output and working safe , it had applied the full chassis as heat sink, so
don't cover other things on the chassis . |
|
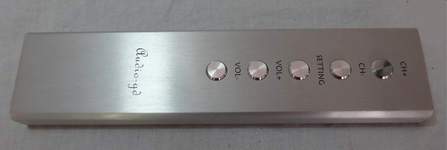
Remote control function:
¡@ |
|
Ang1 to
Ang4:
Select the output source.
The left 2nd digital display
1 :
ACSS input.
The
left 2nd digital display
2: RCA input.
The
left 2nd digital display
3 : RCA input.
The
left 2nd digital display
4 : RCA input.
Vol+ and
Vol- :
Push once to adjust volume up and down in single
step.
H/P:
Select the output modes
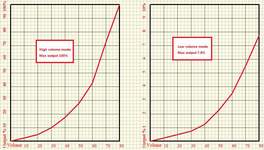
GAIN:
Select the high / low volume mode.
The
left 1st digital display
1: Speaker output with high
volume mode.
( For normal sensitivity speakers ).
The
left 1st digital display
2: Speaker output with low
volume mode
.
( For high sensitivity speakers listen by low volume).
The
left 1st digital display
3: Headphone output with low
volume mode
.
( For normal sensitivity headphones ).
The
left 1st digital display
4: Headphone output with high
volume mode
.
( For low sensitivity headphones , low output level sources ).
Please note :
A , The Precision 1 have large power output, so for most headphone just
need working on low
volume mode .
B , Only for some low sensitivity headphone or connect with the devices
which have very low output level can choice the high
volume mode .
C ,
Select the volume modes from low mode to high mode,
the volume will reset to 0 for avoid the output power increase a
lot.
|
 |
|
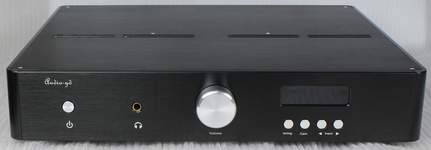
Front
view: |
 |
|
Power
button:
To power ON/Off the
Precision 1. |
|
Setting
button:
Select the output modes
Gain button:
Select the high / low volume mode.
The
left 1st digital display
1: Speaker output with high
volume mode.
( For normal sensitivity speakers ).
The
left 1st digital display
2: Speaker output with low
volume mode
.
( For high sensitivity speakers
listen by low volume
).
The
left 1st digital display
3: Headphone output with low
volume mode
.
( For normal sensitivity headphones ).
The
left 1st digital display
4: Headphone output with high
volume mode
.
( For low sensitivity headphones , low output level sources ).
Please note :
A , The Precision 1 have large power output, so for most headphone just
need working on low
volume mode .
B , Only for some low sensitivity headphone or connect with the devices
which have very low output level can choice the high
volume mode .
C ,
Select the volume modes from low mode to high mode,
the volume will reset to 0 for avoid the output power increase a
lot.
¡@ |
 |
|
Selector
button:
Select the output source.
The left 2nd digital display
1 :
ACSS input 1.
The left 2nd digital display
2: RCA input 2.
The left 2nd digital display
3 : RCA input 3.
The left 2nd digital display
4 : RCA input 4.
¡@ |
|
Volume knob:
Turn Left : Reduce the volume.
(Show on the left 3rd and 4th
digital display )
Turn Right : Increase the volume .
(Show on the left 3rd and 4th digital display )
Because different sources may have
different output level, so before select the input sources, reduce the
volume is more safe .
¡@ |
|
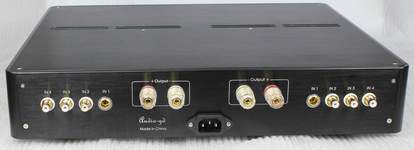
Rear view: |
 |
|
Power connector:
For power
input.
IN 1
sockets
:
ACSS input .
IN 2
sockets
:
RCA input .
IN 3
sockets
:
RCA input .
IN 4
sockets
:
RCA input .
Output
connectors:
Speaker outputs .
¡@ |
|

