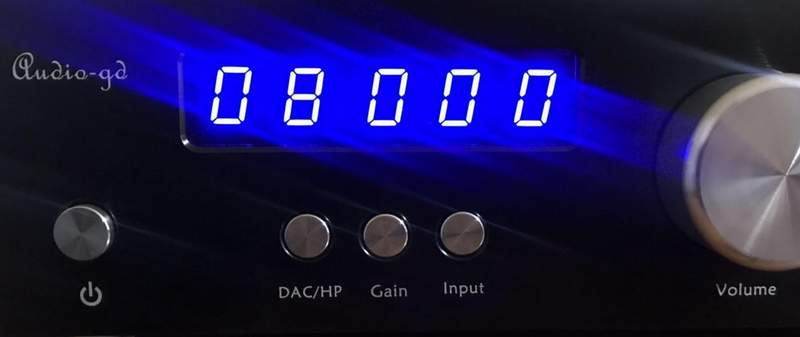
|
Digital
Setting Function Introduce (It has effect on digital inputs only):
The DAC can setting the digital
process functions on front plate to change the sound flavors, without open the unit .

How to active the
digital setting mode:
The "DAC/HP" and "Input"
buttons has dual functions.
While the input between input 5
and input 6, the "DAC/HP" button can select the output mode between
"H" (Headphone output) and "P" (Preamp output) .
While the input is between 1 to
4, the "DAC/HP" button become dual functions.
In case, push the "DAC/HP"
button one time, the left first display flashing around 3 seconds,
in term if the "DAC/HP" button has not push again, the output mode
change either "H" or "P".
If the "DAC/HP" button push
again while the left first display flashing, the unit go into the
digital setting mode.
Important warn:
Before push the
"DAC/HP" button,
we are advice user turn low the amp volume, stop the
music track playing .
Because for
the aim to reproduce the best sound quality, the DAC without mute design , change the
setting may output circuit switch sound .
Around 5 seconds after non
any button had push, the display stop blink, user
can click the music track to playing and turn up the volume.
DAC/HP button :
While the
unit had went into the digital setting mode, the one digit display
will blink for active the function setting , push the "Input" button
can change function .
While the display blink, push "DAC/HP"
again , the right next one digit display will blink for setting .
Left 1st display : Oversampling
"O" for select oversampling,
"N" for select NOS mode.
Left 2nd display : OS and NOS modes
While OS
setting on "O" mean the DAC working under oversampling
mode, lower number OS modes sound became warmer
and smoother. Or depend on your sense .
Mode "0" : class
technology NOS mode.
Mode "2" : 2X oversampling.
Mode "4" : 4X oversampling .
Mode "8" : 8X oversampling.
While OS setting on "N"
mean the DAC working under NOS mode,
different modes offer different sound features, usually mode 3 is
most users favorite. Or depend on your sense .
Mode 1 : Simplest data process
.
Mode 2 : Data fifo.
Mode 3 : Fastest data process.
Left 3rd display : PLL
Active
(1) or Disable (0) PLL for USB and HDMI inputs, we are advice setting
Active (1) for the low performance source but Disable (0) for the
high performance source, or depend on yourself sense .
Left 4th. display : Synchronizer
If the HDMI
input had noise, distortion or some samplings no sound, user can setting the synchronizer ON
(1) or OFF (0) to fixed the issue. In default is OFF (0) .
Left 5th. display : Display
Active (1) the display
auto dark, the display will become dark in around 10 seconds after
stop operate any buttons . Disable (0) the display auto dark, the display light
always.
"Input" button:
While
the display non blink, for select the input sources.
While the display blink, for
setting the digital process functions. |

