Function introduce :
The DAC can setting the digital
process functions on front plate to change the sound flavors, without open the unit .
Working
normal display
:
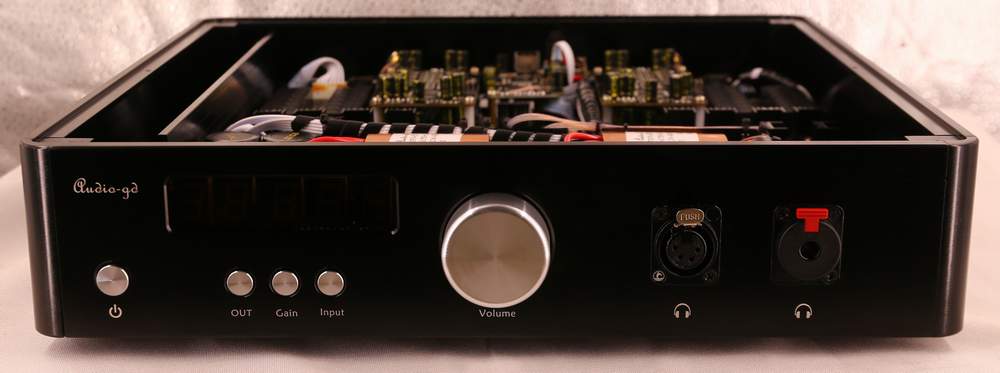
When the product working , the display 1st to 3rd display show the
input signal sampling rate indicator;
44.1, 48.0,88.2, 96.0, 176, 192, 352 and 384 are for the PCM formats, while 064, 128, 256 and 512 are for the DSD formats.

Function
display
:
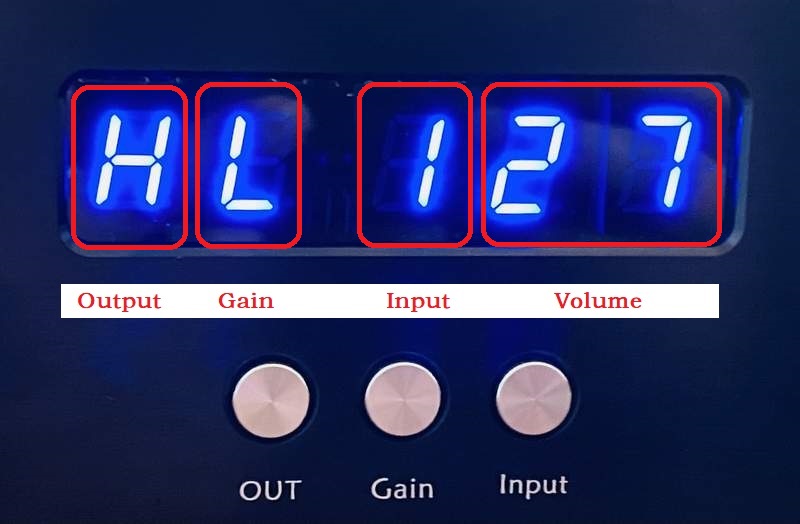
When users push the buttons to change
output mode, gain mode, input channel or volume , the display show
as below.
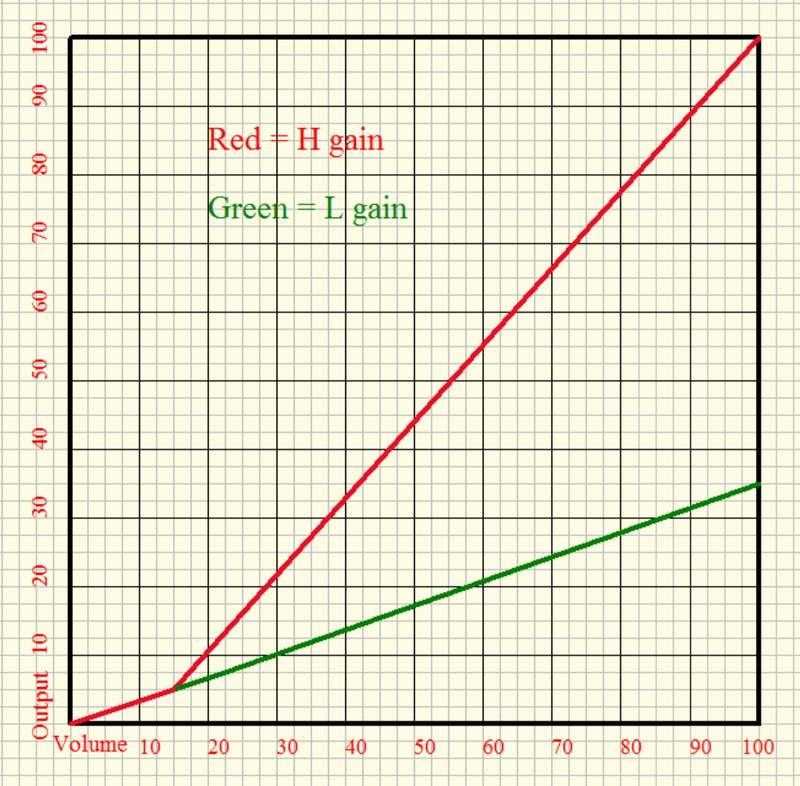
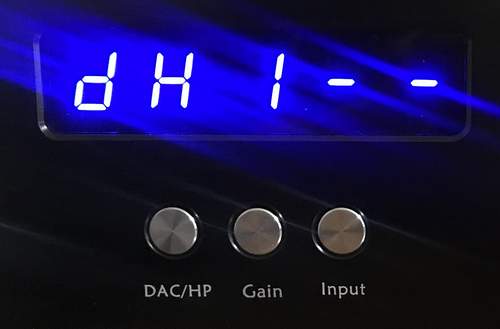
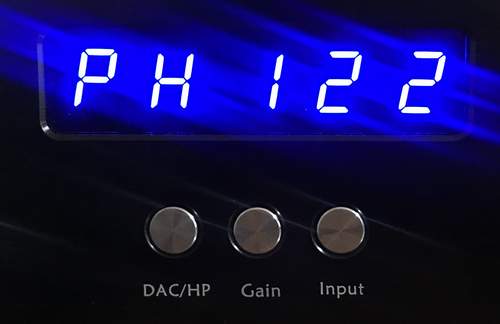
Leftmost digit: :Output mode , H mean
headphone output, P mean preamp output, d mean DAC output.
2nd digit : Gain , H mean high gain ,
L mean low gain.
3rd digit : Input channel .
Input 1: HDMI-IIS input.
Input 2: USB input.
Input 3: Optical input.
Input 4: RCA - coaxial input.
Input 5: XLR analog input.
The remaining digits: Volume .
Setting menu
display
:
How to active the
digital setting mode:
The "OUT" and "Input"
buttons has dual functions.
While the input between input 5
, the "OUT" button can select the output mode between
"H" (Headphone output) and "P" (Preamp output) .
While the input is between 1 to
4, the "OUT" button become dual functions.
In case, push the "OUT"
button one time, the left first display flashing around 3 seconds,
in term if the "OUT" button has not push again, the output mode
change either "H" or "P".
If the "OUT" button push
again while the left first display flashing, the unit go into the
digital setting mode.
OUT button :
While the
unit had went into the digital setting mode, the one digit display
will blink for active the function setting , push the "Input" button
can change function .
While the display blink, push "OUT"
again , the right next one digit display will blink for setting .
"Input" button:
While
the display non blink, for select the input sources.
While the display blink, for
setting the digital process functions.
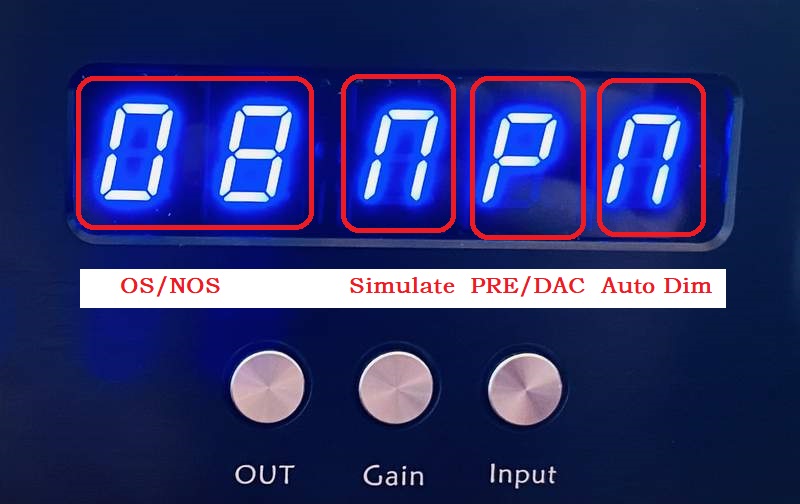
Left 1st display : Oversampling
"O" for select oversampling,
"N" for select NOS mode.
Left 2nd display : OS and NOS modes
While OS
setting on "O" mean the DAC working under oversampling
mode, lower number OS modes sound became warmer
and smoother. Or depend on your sense .
Mode "0" : class
technology NOS mode.
Mode "2" : 2X oversampling.
Mode "4" : 4X oversampling .
Mode "8" : 8X oversampling.
While OS setting on "N" mean
the DAC working under NOS mode, it has one mode now, it is the full
new NOS configure design.
Left 3rd display :
(Simulate
vinyl record
sound
flavor) :
Active
(1) : Simulate vinyl record sound flavor . While active this
function, I are advice setting to OS0 or NOS mode. But in fact, this
function can working with any setting mode.
Left 4th. display : (
Preamp and DAC output mode setting)
Set to P, the output
mode can switch between H (headphone) and P ( preamp) .
Set to d, the output mode can
switch between H (headphone ) and d (DAC).
Left 5th. display : Display
Active (1) the display
auto dark, the display will become dark in around 10 seconds after
stop operate any buttons . Disable (0) the display auto dark, the display light
always.
Setting
examples:(Must select
the input channel between 1 to 4 )
1. Settings for most neutral
sound (8x oversampling, not simulating the TDA mode):
Push the "OUT" button
1 times, when the 1st digit blinking, push the "OUT" button 1 times
for into the setting menu .
When the 1st digit blinking,
push the "Input" button set it to "O" .
Then push the "OUT" button
one more time, the 2nd digit will blink, then push the "Input" button to set
the value to "8".
Then push the "OUT" button
one more time, the 3rd digit will blink, then push the "Input" button to set
the value to "n".
Waiting 6 seconds
the setting menu quit and save the setting.
2. Settings for OS0 and vinyl record simulation mode:
Push the "OUT" button
1 times, when the 1st digit blinking, push the "OUT" button 1 times
for into the setting menu .
When the 1st digit blinking,
push the "Input" button set it to "O" .
Then push the "OUT" button
one more time, the 2nd digit will blink, then push the "Input" button to set
the value to "0".
Then push the "OUT" button
one more time, the 3rd digit will blink, then push the "Input" button to set
the value to "S".
Waiting 6 seconds
the setting menu quit and save the setting.
3. Settings for NOS mode with vinyl record simulation
(new option combination to get the warmest and smoothest sound ):
Push the "OUT" button
1 times, when the 1st digit blinking, push the "OUT" button 1 times
for into the setting menu .
When the 1st digit blinking,
push the "Input" button set it to "n" .
Then push the "OUT" button
2 more times, the 3rd digit will blink, then push the "Input" button to set
the value to "S".
Waiting 6 seconds
the setting menu quit and save the setting.
4. Settings for DAC
output mode available:
Push the "OUT" button
1 times, when the 1st digit blinking, push the "OUT" button 1 times
for into the setting menu .
Then push the "OUT" button
3 more times, the 4th digit will blink, then push the "Input" button to set
the value to "d".
Waiting 6 seconds
the setting menu quit and save the setting.
5. Settings for DAC
auto dim:
Push the "OUT" button
1 times, when the 1st digit blinking, push the "OUT" button 1 times
for into the setting menu .
Then push the "OUT" button
4 more times, the 5th digit will blink, then push the "Input" button to set
the value to "A".
Waiting 6 seconds
the setting menu quit and save the setting.
10 seconds later the user stop
operate the buttons and knob, the DAC display shut auto, only leave
a "-" for show the power is on.
HDMI
definitions :
(Apply HDMI transmit the IIS signal, the pin's definitions must
exact same , and not promise compatible with other brands)
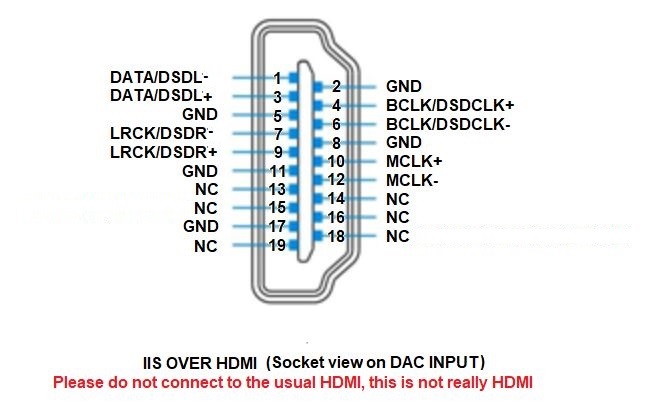
This product don't need the source MCLK signal but even the
source has MLCK output but has not effect .
Firmware update now
features:
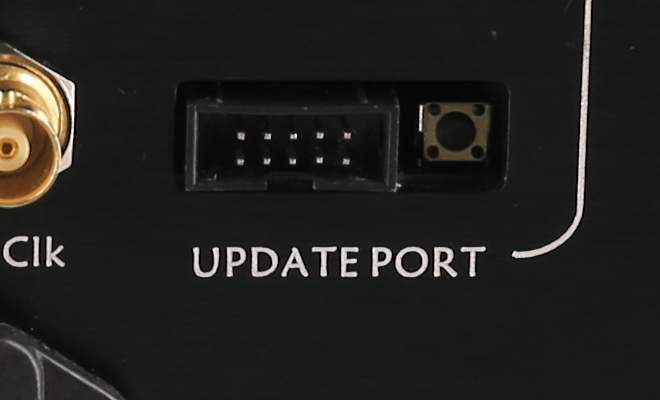
10-pin UPDATE PORT:
To connect the Altera Blaster
and proceed with an FPGA firmware update from Windows, using the
Altera programming software. These updates are meant for upgrading
the functionality and/or sound quality .
FPGA firmware download and update guide:
http://www.audio-gd.com/Firmwaredownload.htm
UPDATE PORT switch :
For updating the built-in Amanero
module's firmware through the USB input.
Please note:
Don't touch this switch when the
product is powered on unless proceeding with an Amanero firmware
update, underwise you will be forced to proceed with an actual
update, as the firmware will have been erased.
Amanero firmware download and update guide:
https://www.amanero.com/combo384_firmware.htm
Amanero firmware update guide :
http://www.audio-gd.com/Pro/dac/Amanero/AmaneroEN.htm
Please download the update tool
and guide from Amanero's official web .
In the official update guide,
there is a step requiring that two pads be shorted more than 1
second on the Amanero module , while with this product, the
end-users only need to push the black button for more than 1 second
in order to perform the same step.
The other update steps are the
exact same as in the official guide.
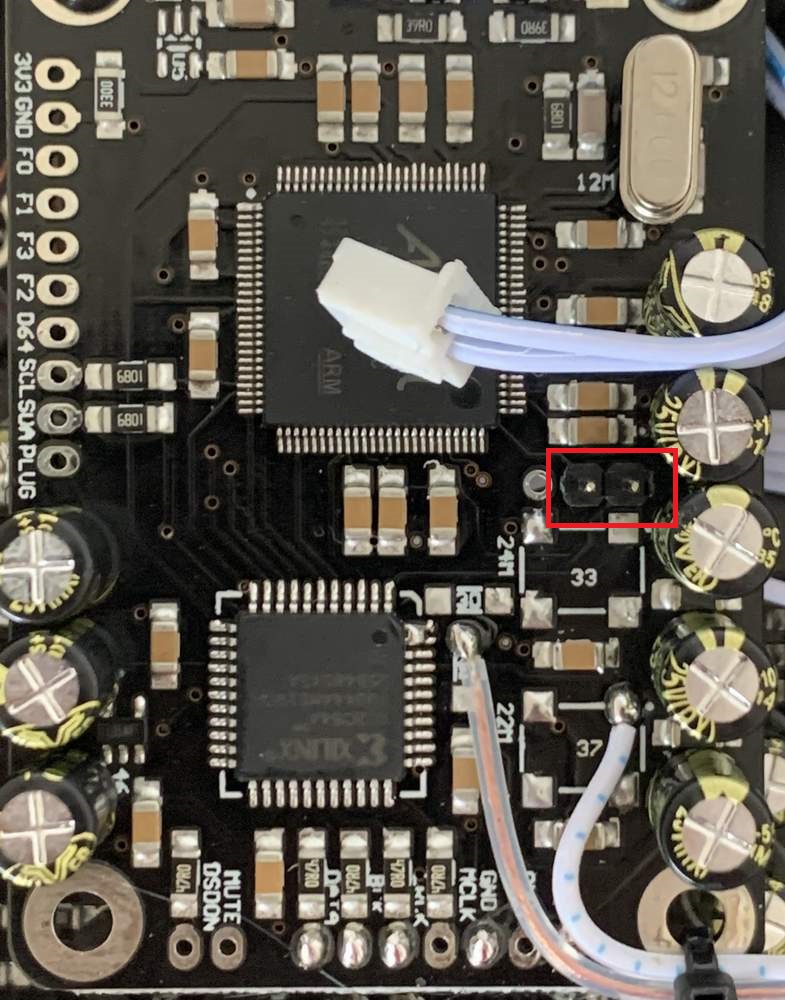
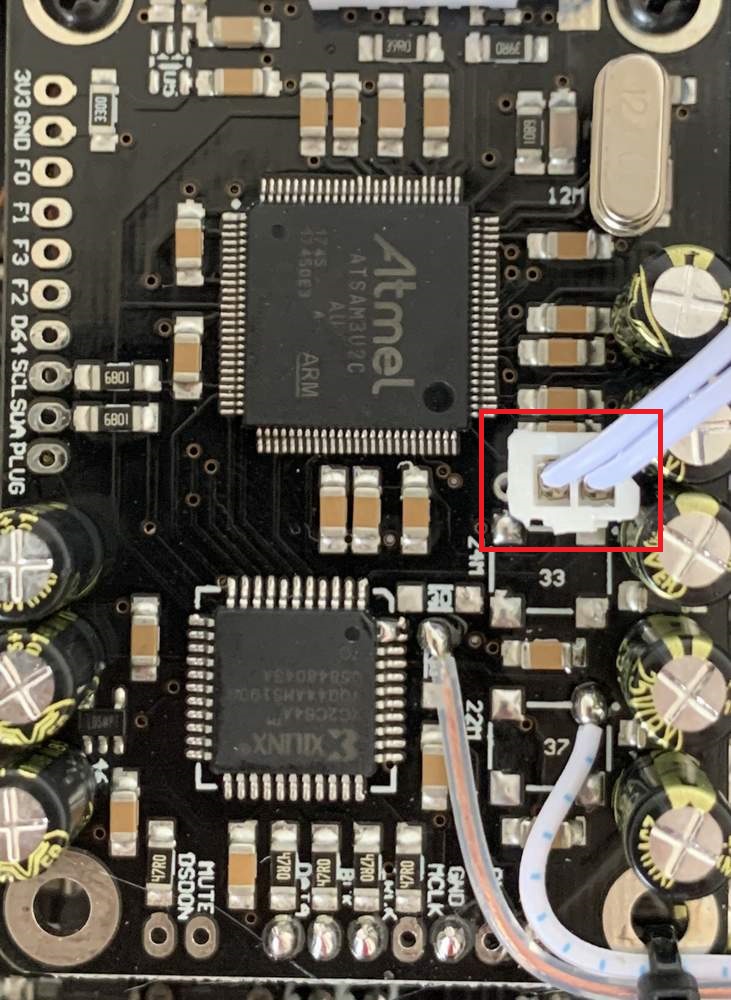
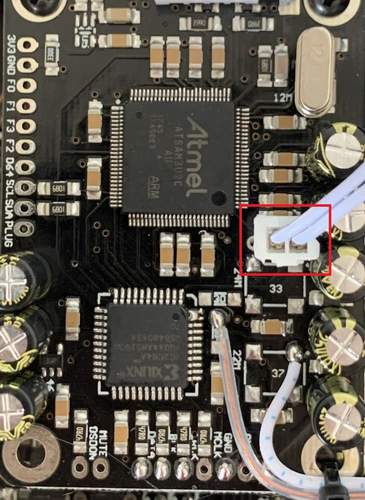
Please note:
Some few customer feedback they accidentally
touch the Amanero update button cause the firmware delete, Since
23rd. July 2021 , the product ship without connect the update button
wire, if customer want to active the update button feature, connect
by self.

 |